
Left-handed guitarists read standard tab from left to right, just like right-handed guitarists. The top line is the high e string and the bottom line is low E. You do not reverse the fret numbers or flip the order of the music.
Chord diagrams can be mirrored for left-handed players, which is where much of the confusion starts. Tab tells you when and where to play; a chord diagram shows a shape. Once you can tell those jobs apart, written lessons become much easier to follow.
Three common ways to write guitar instructions
A chord name, such as Am, tells you the harmony. It does not specify one exact fingering or rhythm. Several arrangements of A, C and E can make an A minor chord. A song sheet with chord names usually expects you to know a shape and supply an appropriate rhythm.
A chord diagram adds a view of the fingerboard. Dots show places to fret, circles show open strings and crosses mark strings to omit. The diagram may show a left-handed or right-handed view, so checking its string labels is part of reading it.
Tablature, usually shortened to tab, uses six horizontal lines and numbers. The lines identify strings and the numbers identify frets. Reading across the page gives you a sequence of actions. A tab can describe a melody, a chord, an arpeggio or a whole arrangement.
You may see all three together: a chord name above a diagram, with a tab underneath showing a picking pattern. Read each part for the information it provides. Do not assume the diagram tells you the rhythm, or that a chord name forces you to strum all six strings.
Learn the six tab lines
Here is an empty tab in standard tuning. The high e is at the top even though it is physically nearer the floor when you hold the guitar normally. Think of the lines as named strings, not as a photograph of your instrument from a particular viewpoint.
e|----------------|
B|----------------|
G|----------------|
D|----------------|
A|----------------|
E|----------------|
The uppercase and lowercase E labels help tell the two E strings apart. Some publishers use numbers instead, with string one at the top and string six at the bottom. Others omit the labels completely. If a tab uses an alternate tuning, find that instruction before trying its notes.
Keep standard tab unchanged when playing left-handed. Your fretting hand is different, but the instruction “B string, fret one” still names the same pitch in standard tuning. Mirroring the page would reverse the time order and send notes to the wrong strings.
For a quick check, point at the A line without touching the guitar, then pluck your open A. Next find G, then high e. A minute of this is worthwhile. It gives you a reliable string map before the numbers begin to compete for your attention.
Read fret numbers in time order
In tab, zero means an open string. One means fret one, two means fret two, and so on. These are fret numbers, not finger numbers. You can choose a comfortable fingering unless the lesson gives a separate suggestion.
Play this original four-note exercise on the B string. Read left to right: open B, fret one, fret three, then fret one again. Leave the other five strings silent. Start with one note per slow count, saying “one, two, three, four”.
e|----------------|
B|--0--1--3--1----|
G|----------------|
D|----------------|
A|----------------|
E|----------------|
The pitches are B, C, D and C in standard tuning. Try index for fret one and ring for fret three. Watch the fretting hand long enough to place a note, then look back at the next number. The aim is to connect a written location with a small action and a sound.
Two-digit frets are a single location. A clearly written 12 means fret twelve, not fret one followed by fret two. Good tab spacing or notation makes that distinction visible. If a plain-text tab is badly aligned, use the lesson’s audio or another reliable edition to clarify it.
Read notes stacked above each other
Numbers placed in the same vertical column normally sound together. The example below is Em. Read the column from any end to identify the locations, then play the chord as one event. The second column repeats the same chord.
e|--0------0------|
B|--0------0------|
G|--0------0------|
D|--2------2------|
A|--2------2------|
E|--0------0------|
Compare that with notes spread across the page. If the same chord’s notes appear one after another, you pick them in that written order. That is an arpeggiated chord: the notes belong to a chord, but they are sounded separately rather than as one strum.
Try fretting Em and picking low E, A, D and G in sequence. Write four numbers on the appropriate lines, each a little farther right. Then write those numbers in one column and strum them together. Making your own tiny tab is an excellent way to check that the system makes sense.
A blank line at a particular moment does not mean play that string open. Only a written zero asks for an open string. This matters in chords such as D, where the two thickest strings should be omitted in the basic open shape.
Find out how the rhythm is shown
Basic text tab often tells you the note order without giving precise durations. A longer dash is not a dependable timing rule across every publisher. Some writers space notes roughly according to time; others space them only to keep the numbers readable.
More detailed tab may use stems, beams, rests and time signatures, much like standard notation. It may also sit below a notation staff that provides the rhythm. Read the legend or introductory notes. If the lesson provides a count or recording, use that information rather than inventing timing from the gaps.
For our written beginner examples, we tell you the count separately. “One note on each beat” means four evenly spaced notes in a bar of four beats. “Two notes per beat” means counting “one and two and three and four and”, with a note on every word.
Try the B-string exercise first with one note per beat. Then play the first note on beat one, leave beat two silent, and play the remaining three on “three and four”. The fret sequence is unchanged, but the phrase feels different. Tab locations and musical rhythm are related information, not the same information.
Read a left-handed chord diagram
Our vertical diagrams show high e on the left, then B, G, D, A and low E as you move right. The nut is at the top. This is the mirror image of a common right-handed chord chart. Dots sit between fret lines, where your fingertips press the strings.
For the Am shown here, index finger presses B at fret one, middle presses D at two and ring presses G at two. A and high e are open. The low E is marked X. The written low-to-high recipe is x02210, so the chart and recipe describe exactly the same locations.
A number inside a dot usually suggests a fretting finger: one is index, two middle, three ring and four little finger. A number printed beside the whole diagram may instead tell you its starting fret. Read the chart’s key, especially when the shape is farther up the neck.
If you find a right-handed chart, translate the named strings and frets or use a trusted mirrored version. Avoid rotating the image upside down. A rotation also moves the nut and reverses more than the string order. You want the correct left-handed view, not a new set of pitches.
Read a scale map as a map
Our horizontal scale maps put high e at the top and the nut on the right. Higher fret numbers run leftwards, towards the body. Each dot is an available scale note. Dark dots mark roots, which are the notes that name the scale and provide useful places to finish a phrase.
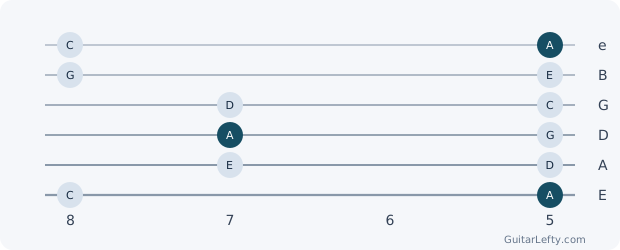
There is no automatic time order in a scale map. You might play ascending pitches, a repeated three-note phrase or an arpeggio through selected dots. Following the dots from the top-left corner to the bottom-right corner is not necessarily an ascending scale.
A fret window is a portion of the neck shown for convenience. It is not automatically a named fingering system or a CAGED chord shape. Our lessons deliberately use that term so you can distinguish a view of notes from a particular prescribed pattern.
To turn the map into an exercise, choose a starting root and write a route using string names and fret numbers. Use the fretboard tool to hear the notes and check whether the pitch rises. Once the route is clear, try it without staring at every dot.
Understand the symbols you will meet next
Tab symbols vary between publishers, so a legend always wins over a general rule. These are common meanings. Learn one technique at a time and practise its sound slowly before putting it into a faster phrase.
- 3h5: pick fret three, then hammer a finger onto fret five on the same string without a second picked attack.
- 5p3: sound fret five, then pull off to a finger already fretting three. It is not simply a silent lift.
- 3/5: slide from fret three to five while keeping contact with that string.
- 5\3: slide from fret five down to three.
- b: bend the string to raise the pitch; the notation should indicate the intended target or amount.
- r: release a bend towards its original pitch.
- ~: often vibrato, a controlled variation around a sustained note.
- x: often a muted or dead-note sound in tab, depending on the legend.
The X in a chord diagram and an x used as a rhythmic tab event need careful distinction. In a chord diagram, it usually means omit the string. In a tab part, a written x may ask for a deliberate muted attack at that moment.
For bending, follow a pitch target rather than a screen direction. Left-handed technique demonstrations can clarify the movement, but your ear decides whether a whole-tone bend has reached its note. Do not force a bend just because the symbol looks simple. A clear picked target note is a useful reference.
For another explanation of the basic tab system and common techniques, see Guitar Tricks’ tab guide. Use a lesson’s own legend when its notation differs.
Keep a small reference beside your first few tabs: line means string, number means fret, and movement across the page means time. If you forget a symbol, check it before guessing. Reading accurately at a slow pace is more useful than playing a familiar-sounding sequence that does not match the written instruction.
Clear reading gives your practice a target: you can compare the sound you made with the sound the instruction describes.
Try a ten-minute reading session
Spend two minutes locating open strings from their tab lines. Spend three minutes playing the B-string example slowly, then reverse its note sequence deliberately. That reversal is your own new exercise; it is not something left-handed readers are supposed to do automatically.
Next, spend two minutes comparing the Am chart with its x02210 recipe. Say every string location aloud. For the remaining three minutes, choose four notes from the A minor scale window and write a tiny tab that someone else could read.
Check your work by playing exactly what you wrote, rather than what you remember intending to write. Are the notes on the correct strings? Are simultaneous notes stacked? Have you stated a rhythm? If another player could follow it without watching your hands, your instructions are becoming clear.
When a new lesson looks confusing, ask three questions: Which tuning is it using? What view or notation system am I looking at? Where is the timing explained? Those questions solve many reading problems before they become playing problems. You can now use the chord guide or pentatonic guide with a much clearer map.
Prepared for Guitar Lefty with AI assistance. The written exercises are original teaching examples. All fret numbers assume standard tuning unless stated otherwise.