
Learning guitar left-handed starts with a few simple things: holding it comfortably, tuning the strings and finding your first notes. Your left hand picks or strums, and your right hand presses the strings against the neck. The chords, notes and songs are the same as for a right-handed player.
Keep your guitar beside you and try each step as you read. We'll show you the parts, explain where your fingers go, and help you play two chords and a short melody. You don't need to read music or know any theory to begin.
1. Choose a comfortable starting point
If you already own a playable left-handed guitar, begin with that. You don't need a new instrument because a lesson uses a different brand or body shape. The important questions are whether you can reach the strings comfortably, tune them, and press a note without using a great deal of force.
If you haven't bought one yet, choose between acoustic and electric by thinking about the music you want to play. An acoustic works without an amplifier. An electric needs amplification or a suitable headphone setup to hear its amplified sound. Either can teach you chords, timing and melodies. There's no rule that everyone must start on acoustic.
A purpose-built left-handed guitar is usually the simplest route into the mirrored shapes used here. Flipping a right-handed guitar is a separate choice, and reversing its strings can involve more than fitting a new set. Read the conversion guide before spending money on that approach.
Not sure which orientation suits you? Try both with a teacher or a helpful shop assistant. Notice which way feels easier to hold and strum. Our left or right-handed guide gives you a fair comparison exercise.
For now, collect a tuner, a few picks if you want to use one, and somewhere safe to put the guitar. A strap is useful even when sitting. A notebook or a note on your phone can hold your practice plan. You can add accessories when a real need appears.
2. Get to know the parts you'll use
Before playing, find these parts on your own guitar. The picture shows an acoustic guitar from the front. An electric has the same main parts, although its body usually has pickups, switches and knobs instead of a soundhole.

- Body
- The large part that rests against you. On an acoustic, the hollow body helps make the sound louder. The round opening in the front is the soundhole. On an electric, pickups beneath the strings send a signal to your amplifier.
- Neck and fretboard
- The neck is the long part you reach around with your right hand. The fretboard, also called the fingerboard, is its flat front surface, underneath the strings. Your fingertips press the strings down here to change the notes.
- Frets
- These are the thin metal strips across the fretboard. Lessons also use “fret” to mean the space just before a strip. “Play fret two” means press the string in the second space from the nut, close to the second metal strip.
- Nut
- The narrow strip where the fretboard meets the headstock. Each string sits in a small slot in the nut. Start counting fret spaces from here: the first space is fret one, the next is fret two.
- Headstock and tuning pegs
- The headstock is the end of the neck, beyond the nut. Its tuning pegs, also called tuning machines, tighten or loosen the strings to change their pitch. Trace a string to its peg before turning it.
- Bridge and saddle
- The bridge sits on the body at the other end of the strings. On an acoustic, the saddle is the narrow strip in the bridge that the strings rest on. Many electrics have a separate small saddle for each string.
When a lesson says “towards the nut”, move towards the headstock. “Towards the body” means the other direction, where fret numbers get higher. Try pointing each way on your own guitar before moving on.
Where does your fingertip go?
Look at the close-up below. To play fret two, count two spaces from the nut. Put your fingertip in that second space, close to the metal strip on the body side of the space. Keep your finger on the nut side of the strip, rather than on top of it. Press the string down, then pluck it with your left hand.

Try the note, lift your finger and try again. If it buzzes, check that you're close to the fret wire before pressing harder. If it sounds clear, ease the pressure a little and see how lightly you can hold it while the note still rings.
An open string is a string played without pressing it against a fret. Guitar tab writes this as 0. Try the A string open, then at fret two: you have changed from A to B. The dots built into your fretboard help you find your way along the neck; they don't tell you which notes to play.
On an electric, start with a clean, quiet amplifier sound. Turn the volume down before connecting cables, then raise it gradually. A clean sound makes it easier to hear muted strings and buzzing notes.
3. Sit in a way that lets your hands move
Use a stable chair without arms, or one that leaves your elbows free. Hold a left-handed guitar with the neck pointing to your right as you look down at it. Your left hand rests near the body to strum; your right hand reaches around the neck to press the strings. The thickest string should be nearest the ceiling and the thinnest nearest the floor.
There's more than one good sitting position. Some players rest the body on one thigh; others use a more central position with the neck raised. Try a small change in neck angle and notice whether your right wrist can stay comfortably relaxed. A strap can help the guitar stay put.
Your fretting hand should not have to carry the whole instrument. If the neck falls away every time you loosen your grip, improve the support first. Otherwise it is easy to squeeze harder just to stop the guitar moving, and every chord becomes more work than it needs to be.
Look at the strings when you need to, but avoid folding yourself over the guitar for the entire session. Bring the diagram onto a stand or screen at a useful height. Play a short phrase, look away, and see whether you can find the same starting note again.
If something hurts or feels strained, stop and rest. Check that the guitar is supported and your wrist isn't bent awkwardly. If the problem keeps returning, ask a teacher to watch you play and help you adjust your position.
4. Learn the string names and tune first
Standard tuning, from the thickest string to the thinnest, is E–A–D–G–B–e. The little e is simply a convenient way to distinguish the higher E string from the lower one. Left-handed playing doesn't change those pitches. The strings are also numbered six to one in that same thick-to-thin order.
| String | Open note | Quick description |
|---|---|---|
| 6 | E | Thickest, lowest sounding |
| 5 | A | Next thickest |
| 4 | D | Middle bass string |
| 3 | G | Next towards the floor |
| 2 | B | Second thinnest |
| 1 | e | Thinnest, highest sounding |
Use a tuner and pluck one string gently. Let the display settle before changing anything. Trace that string to its tuning machine so you know you're turning the correct one. Make a small adjustment, pluck again, and listen. Headstock layouts vary, so learn which direction raises the pitch on your instrument rather than copying a universal turning direction.
If the note is below the target pitch, it is flat. If it is above, it is sharp. A chromatic tuner may show other note names along the way. Check the intended note and octave, especially with new strings or an unfamiliar guitar. If you're very unsure, ask someone to demonstrate instead of tightening a string repeatedly.
Tune each string, then check all six once more. Get used to doing this at the start of every session. It gives your ears a dependable starting point. Fender’s standard-tuning reference also provides the six pitches if you want to hear them.
5. Give each hand one small job
For the first minute, your left hand can simply pluck the open high e string. Aim for a small, repeatable movement. If you use a pick, hold it between your thumb and index finger with a little of its tip showing. Try a relaxed grip that stops it spinning without making your whole hand stiff.
You can also start with a thumb or fingertip. Pick one approach for this exercise so you have fewer things to think about. The useful skill is finding the intended string and making a clear sound. You can explore different picking styles later without having wasted any of this work.
Now add your right hand. Put your index finger just behind fret one on the high e string and pluck it. Release the pressure, then play the open string. Listen to the difference. Try fret two with your middle finger, then return to open. Move slowly enough to hear each note start.
Use the least pressure that gives you a clear note. If it buzzes, check your fingertip position before adding force. If it sounds dull, make sure another finger isn't touching the string. If it sounds sharp, you may be pushing the string sideways or pressing harder than necessary.
The finger numbers in our lessons refer to your right hand, which presses the strings: 1 = index, 2 = middle, 3 = ring, 4 = little finger. Your thumb isn't numbered. Try touching each fingertip with your thumb as you say its number. These are finger numbers; the numbers beside the neck in a diagram are fret numbers.
6. Read a diagram before copying the shape
Our vertical left-handed chord diagrams place high e on the left and low E on the right, with the nut across the top. That's a mirrored chart compared with a common right-handed chord diagram. Read the string labels first, because other websites may use a different view.
A dot tells you where to fret a string. A number on the dot tells you which fretting finger to try. A circle above a string means play it open. An X means leave that string out. The same chord name can have several good fingerings, so an unfamiliar number isn't automatically a mistake.
Our horizontal scale diagrams are another view: high e is at the top and the nut is on the right. Higher fret numbers run towards the left. The dark circles identify roots, the notes that name the scale. A diagram is a map of available notes, not a command to play every dot from one edge to the other.
Tab is different again. Standard guitar tab reads from left to right in time for left-handed and right-handed players. Its top line is high e and its bottom line is low E. Don't mirror a tab just because you play left-handed. The tab-reading guide walks through that with short examples.
7. Make your first E minor chord
Start with E minor, usually written Em. Put your right middle finger on the A string at fret two and your ring finger on the D string at fret two. Leave the other four strings open. You can use index and middle instead if that arrangement feels more manageable.
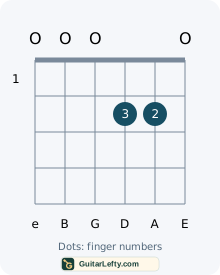
Before strumming, pluck each string once from thickest to thinnest. You should hear six clear notes. If G sounds dull, the finger on D may be leaning into it. If A or D buzzes, move the relevant fingertip a little closer to the fret. Change one thing and check again.
Now brush across all six strings with a gentle downstroke. “Down” means from the thicker strings towards the thinner strings, towards the floor in your normal playing position. It doesn't mean moving from the left of the screen to the right.
Hold the chord for a few seconds, relax your hand, then build it again. Do five calm repetitions. You're teaching your fingers where to go; keeping the shape clenched for a long time isn't the same job. Use our Em chord lesson to see the mirrored diagram and hear the notes.
If a full strum feels too busy, pick only the middle four strings for a moment while you check your fingers. Return to all six when you're ready. Check one unclear string at a time, then strum again to hear whether your adjustment helped.
8. Add A minor and practise a real change
For A minor, or Am, put your index finger on B at fret one, middle finger on D at fret two, and ring finger on G at fret two. The A and high e strings stay open. Start the strum on A and leave the low E string out.
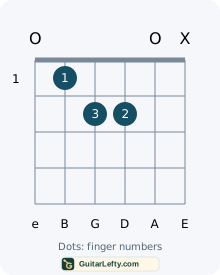
Notice that Em and Am both use fingers around fret two, but the shapes sit on different strings. Look at each string name while making the change. That's more reliable than trying to move a shape vaguely “up” or “down”, words that can mean several things on a guitar.
Build Em, strum once, release, and build Am. Give yourself as much time as you need. After a few changes, add a count: say “one, two, three, four” on Em, then do the same on Am. At first you can strum only on one and use the remaining beats to prepare.
If the next chord is late, slow the count or use eight counts per chord. Keep the count steady as you change. Speed can come later. Try to keep your fingers close to the strings instead of throwing the whole hand away between shapes.
A small win is being able to alternate the two chords without looking back at the instructions. Another is choosing the correct starting string for each strum. These are useful musical skills. You don't need to collect ten more chords before this counts as progress.
9. Find a pulse before adding a strumming pattern
Tap a steady beat with your foot or quietly count four numbers. A pulse is the regular beat underneath the music. A strumming pattern is the arrangement of sounds and spaces you place over it. Keeping those jobs separate makes rhythm much easier to learn.
Hold Em and play one downstroke on each number: one, two, three, four. Keep the stroke small. Listen for an even gap between sounds. You can also rest your fretting fingers lightly across the strings to mute them and practise the movement without worrying about a chord.
A metronome makes steady clicks to help you keep time. Open the practice room and try 50–60 beats per minute (BPM). At 60 BPM, there's one click each second. Slow it down if you need more time to change chords. You can also practise by counting aloud before adding the click.
Next, strum only on beats one and three while continuing to count all four beats. Let the chord ring through beats two and four without strumming again. Those gaps still take time. This teaches you to keep a pulse without filling every gap. It will help later when you add upstrokes, chord changes and short melodic phrases.
Try eight bars of Em and Am, four counts per chord. If four strums are too much during a change, use one strum per bar. Keep this simple until you can change chords without stopping the count.
10. Play a small E minor scale exercise
A scale is a set of notes you can use to make melodies. The root is the note that names it: E is the root of E minor. Start with the eight notes below, from a low E to the next E. That distance is called an octave. Play them in order, one at a time.
- Low E string, open: E.
- Low E string, fret two: F sharp.
- Low E string, fret three: G.
- A string, open: A.
- A string, fret two: B.
- A string, fret three: C.
- D string, open: D.
- D string, fret two: E.
Play one note at a time and leave a short gap between them. Try fingers one and two for frets two and three, or fingers two and three if that feels easier. A suggested fingering is a starting point. Use the fingering that lets you play the notes clearly and comfortably.
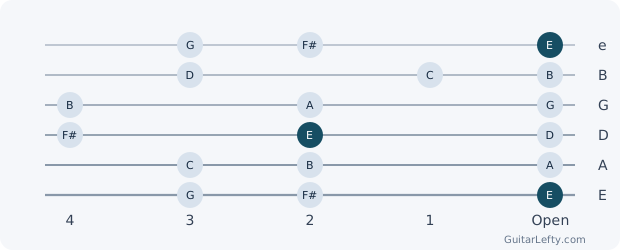
Go back down the same route, then finish on the low E. Listen to that final note as a place to rest. Next time, play just E, G, A, G, E using low E open, low E three, A open, low E three, low E open. That little phrase uses a few scale notes without sounding like a full exercise.
The E natural minor lesson has the larger map. Use the interactive fretboard to check note names, and the printable sheet if you would rather keep the screen out of the way.
11. Build a short practice routine
Try this ten-minute routine. Keep each task slow enough to hear the notes clearly, and take a break whenever you need one. If you have less time, tune up and practise just one chord change.
- Two minutes: tune, settle the guitar and play a few open strings.
- Three minutes: check Em and Am, then change between them slowly.
- Two minutes: count a steady pulse and strum one chord in time.
- Two minutes: play the one-octave E minor route or a short phrase from it.
- One minute: enjoy something you can already do and note tomorrow’s next step.
Write a useful observation rather than a verdict. “The G string buzzed in Am” tells you what to check. “I am bad at guitar” tells you nothing. “Four clean changes at a slow count” is a result you can build on, even if another player would find that exercise easy.
Record a short clip occasionally, with your phone if you like. Listen for timing, note clarity and the length of pauses between changes. Don't compare a first-week recording with a polished performance. Compare it with an earlier version of your own exercise.
Our first thirty days plan turns this idea into a flexible month of tasks. Repeat days whenever you need to. The calendar is a way to organise practice, not a deadline for your fingers.
12. Solve the problem you can actually hear
If a string buzzes, first find out which one. Pick the chord string by string, check the fret number, and move the fingertip closer to the fret without sitting on it. Try a little more pressure only after checking position. If many notes buzz despite careful fretting, have the instrument checked.
If a string is silent, look for accidental contact. A nearby fingertip, the side of your index finger or part of your picking hand might be touching it. That contact is useful when you deliberately mute a string, but it gets in the way when the string is meant to ring.
If every chord sounds wrong, tune again before rebuilding your technique. If individual notes sound clean but changes stop the rhythm, make the rhythm simpler. If you keep hitting the wrong bass string, practise just the start of the strum on the correct open string.
When you feel stuck, choose one question for a teacher: “Can you see why my high e is muted in Am?” is easier to solve than “Why can’t I play?” A short demonstration from someone who can see both hands may clear up a problem you have been trying to solve from a flat picture.
Buzzing strings and slow chord changes are common when you start. If the same note stays unclear after you have checked your fingers, ask a teacher to try it too. They can help you work out whether to adjust your technique or have the guitar checked.
13. Try a small musical exchange
If you have someone to play with, agree on a tiny task before starting. One person can keep four quiet counts while the other strums Em on beat one. After four bars, swap jobs. You're practising a shared pulse, so neither person needs to add a complicated part.
Another option is a question and answer. Play E–G–A–G–E, leave a bar of space, then let the other person answer with the same notes in a different rhythm. Count through the gap so you both know when the answer begins. Listen without playing over it.
If you practise alone, record the count or a simple chord and answer it. Keep the sound quiet enough to hear your own notes. Listen to the other part and count so you know when to join in. This gives your first few notes a musical purpose before you know a whole song.
14. Decide what to learn next
When Em and Am feel familiar, choose a direction. If you want to accompany songs, add C, G and D from the eight-chord guide. If melodies interest you, spend more time making short phrases from E minor. If your hands know the shapes but the rhythm wanders, work through the strumming guide.
There's no need to begin barre chords, all five pentatonic positions and complex theory in the same week. A small set of notes you can hear and use is more valuable than a long list you can only recognise on a page. Add new material when it gives you a musical reason to use it.
You can use right-handed song lessons too. Keep the chord names, rhythm and standard tab as written; translate a fretting demonstration carefully or use a mirrored chord chart. Don't reverse the actual note sequence. Once you know the string names, you can turn many spoken instructions into your own hand movements.
For today, finish with one complete little performance: four counts of Em, four counts of Am, then the short E–G–A–G–E phrase. It may be slow. That's fine. You have tuned an instrument, made two chords, followed a pulse and played a melody. Those are the building blocks you'll keep using as your music grows.
Prepared for Guitar Lefty with AI assistance. The written exercises are original teaching examples. All fret numbers assume standard tuning unless stated otherwise.